Power9 Virtualization: how we structured an isolated environment with KVM and Libvirt
Context
Given the need to establish isolated and secure environments for installing libraries, frameworks, and general-purpose tools, environment encapsulation emerged as an effective solution, implemented through KVM managed via virt-manager and virsh.
Virtualization is widely used in x86 environments, with mature tooling and established workflows. However, when migrating to architectures such as IBM Power9 (ppc64le), many of these processes are no longer straightforward and require architecture-specific adaptations. Below, we provide a diagram showing this interaction across four layers.
Communication flow between Hardware (Power9) and Virtual Machines
The flow is organized into the following layers:
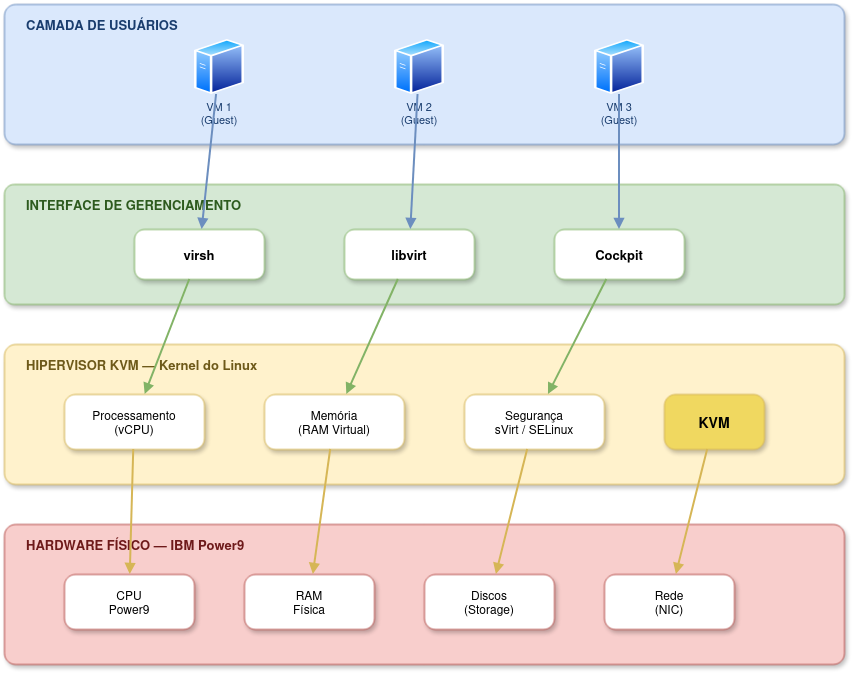
Figure 1: Diagram representing a 4-layer virtualization architecture.
In this work, we explore how to build a virtualized environment using KVM and Libvirt on a Power9 server, with focus on isolation, reproducibility, and shared team usage.
TL;DR
- We implemented a virtualized environment on Power9 using KVM + Libvirt.
- We adapted common virtualization workflows to
ppc64le, solving permission, write-lock, and provisioning issues. - The environment provides secure isolation between users and straightforward VM management.
- We provide ready-to-use images with NVIDIA/CUDA drivers for immediate use.
Environment used
- Architecture: IBM Power9 server (
ppc64learchitecture). - Operating System (OS): AlmaLinux 8.10 binary-compatible with Red Hat Enterprise Linux (RHEL) 8.9/8.10.
- RAM: 512GB.
- Execution: Virtual Manager for Virtual Machine (VM) management.
- Hypervisor: KVM (Kernel-based Virtual Machine) / QEMU.
- Management: Libvirt (
virsh,virt-install,virt-customize). - Storage: Virtual disks in
.qcow2format. - GPUs: 4x NVIDIA Tesla V100 SXM2 16GB (NVLink2).
Installing the virtualization environment (KVM + Libvirt)
Before creating any VM, you need to install and configure KVM and Libvirt on the Power9 server.
- Package installation:
sudo dnf install -y qemu-kvm libvirt libvirt-client libvirt-daemon libvirt-daemon-kvm virt-install virt-viewer guestfs-tools \
libguestfs-tools python3-libvirt
- Starting the service:
sudo systemctl enable --now libvirtd
sudo systemctl status libvirtd
- Adding your user to the
libvirtgroup: So non-root users can manage VMs without requiringsudofor every command:
Run the command below:
sudo usermod -aG libvirt $(whoami)
Log out and log back in for the change to take effect.
- Verifying the installation:
Check virsh version:
sudo virsh version
Validate CPU virtualization support:
sudo virt-host-validate
Setup
- Environment preparation:
In KVM, the fastest way to provision VMs is to clone a “seed” image (
.qcow2) and expand it, instead of performing a clean install from ISO. To keep things organized, all virtual disks should be stored in a dedicated directory:
Download the AlmaLinux 8 base image:
cd /home/user/
wget https://repo.almalinux.org/almalinux/8/cloud/ppc64le/images/AlmaLinux-8-GenericCloud-latest.ppc64le.qcow2 -O alma8_base.qcow2
- Hypervisor management: Hypervisor and instance administration follows specific procedures to ensure system stability. Administrator commands to control virtualization services on Power9:
Stop KVM services:
sudo systemctl stop libvirtd
Start KVM services again:
sudo systemctl start libvirtd
Enable at boot:
sudo systemctl enable libvirtd
- Permission setup:
The system user running KVM (
qemu) needs permission to access VM disks. If disks are stored inside a personal home directory, Linux blocks access by default. To allow hypervisor access without exposing personal files, grant execute (o+x) permission on directories:
Allow qemu to traverse the home directory (traversal only, no read permission):
chmod o+x /home/user
Allow qemu to access the disk directory:
chmod o+x /home/user/discos
- Virtual network configuration (Libvirt):
Libvirt creates a default NAT network (
default) that places VMs in the192.168.122.0/24range. VMs can access the internet through NAT, but they are not directly reachable from external networks without additional setup.
Check network status:
sudo virsh net-list --all
If inactive, start and enable at boot:
sudo virsh net-start default
sudo virsh net-autostart default
If the network does not exist, define and initialize it:
sudo virsh net-define /usr/share/libvirt/networks/default.xml
sudo virsh net-start default
sudo virsh net-autostart default
If the XML file is missing, install the network config package:
sudo dnf install -y libvirt-daemon-config-network
- Creating new VMs:
Clone the base image:
cp /home/user/alma8_base.qcow2 /home/user/discos/nome_vm.qcow2
Expand the disk (must be done BEFORE creating the VM):
qemu-img resize /home/user/discos/nome_vm.qcow2 +100G
Create the VM:
sudo virt-install \
 --connect qemu:///system \
 --name vm_nome \
 --memory 131072 \
 --vcpus 16 \
 --cpu host \
 --disk path=/home/user/discos/nome_vm.qcow2,format=qcow2 \
 --import \
 --os-variant almalinux8 \
 --network network=default \
 --graphics none \
 --noautoconsole
- Post-creation VM customization:
After creating the VM, you must set the root password, since cloud images usually come without one. We use
virt-customizefor this. Important: the VM must be powered off before safely editing its disk.
Shut down the VM:
sudo virsh shutdown vm_nome
Wait for complete shutdown:
sudo virsh list --all
Inject the root password into disk:
sudo virt-customize -a /home/user/discos/nome_vm.qcow2 \
 --root-password password:senha_desejada
Start the VM again:
sudo virsh start vm_nome
- Accessing VMs:
Via serial console
Connect to VM console:
sudo virsh console vm_nome
To exit the console, use Ctrl + ].
Via SSH
Find the VM IP address:
sudo virsh domifaddr vm_nome
Access via SSH:
ssh root@<ip_da_vm>
- Managing and deleting VMs: If you need to destroy an environment and recreate it from scratch, follow these 3 mandatory cleanup steps:
Force-stop the VM:
sudo virsh destroy nome_da_vm
Remove VM definition from Libvirt:
sudo virsh undefine nome_da_vm
Delete the virtual disk to free Power9 storage:
rm -f /home/user/discos/nome_da_vm.qcow2
- Creating a VM from an existing image (cloning): To create a new VM from an already configured image, such as prebuilt NVIDIA-ready images:
Option A: clone via qemu-img (keeps original image intact):
qemu-img create -f qcow2 -b imagem-base.qcow2 -F qcow2 nova-vm.qcow2
Option B: clone via virt-clone:
virt-clone \
 --original vm-base \
 --name vm-nova \
 --file /home/user/discos/nova-vm.qcow2
If needed, you can execute the VM deletion step above and recreate it according to step 5.
Ready-to-use images with NVIDIA drivers
To simplify the use of Tesla V100 GPUs available on the server, we provide pre-configured .qcow2 images with NVIDIA drivers, CUDA, and cuDNN already installed. This removes the need to configure the base environment for every new use.
Available images:
Image Contents AlmaLinux-8-Power9-NVIDIA-drivers.qcow2.xz AlmaLinux 8.10 + drivers NVIDIA 535 + CUDA 12.2 + cuDNN 9.0 How to use pre-configured images:
Download and decompress the image:
wget <url_do_repositorio>/AlmaLinux-8-Power9-NVIDIA-drivers.qcow2.xz
xz -d AlmaLinux-8-Power9-NVIDIA-drivers.qcow2.xz
Move it to the disks directory and create a VM from it:
cp AlmaLinux-8-Power9-NVIDIA-drivers.qcow2 /home/user/discos/minha-vm-gpu.qcow2
Create the VM as usual:
sudo virt-install \
 --connect qemu:///system \
 --name vm_gpu \
 --memory 131072 \
 --vcpus 16 \
 --cpu host \
 --disk path=/home/user/discos/minha-vm-gpu.qcow2,format=qcow2 \
 --import \
 --os-variant almalinux8 \
 --network network=default \
 --graphics none \
 --noautoconsole
For the VM to access physical GPUs, PCIe passthrough must be configured as described in the next post of this series.
- How to generate a new image from a configured VM: After installing drivers or any software inside a VM, you can export its current state as a reusable image:
Shut down the VM:
sudo virsh shutdown vm_nome
Convert and compress the image (removes unused space):
qemu-img convert -O qcow2 -c \
 /home/user/discos/vm_nome.qcow2 \
 /home/user/discos/AlmaLinux-8-Power9-minha-imagem.qcow2
Compress for distribution:
xz -T0 -v /home/user/discos/AlmaLinux-8-Power9-minha-imagem.qcow2
Expected output: AlmaLinux-8-Power9-minha-imagem.qcow2.xz.
Verify image integrity:
qemu-img check AlmaLinux-8-Power9-minha-imagem.qcow2
qemu-img info AlmaLinux-8-Power9-minha-imagem.qcow2